Measure the room; then let the chair earn its space.
If you're experiencing back pain after long gaming sessions or your chair doesn't quite fit your space, your solution isn't necessarily buying a whole new chair. The right gaming chair modding guide can transform your current setup with strategic aftermarket gaming chair parts that solve your specific problems. Great ergonomics must coexist with your room, desk, and devices (not compromise any of them). This isn't about flashy aesthetics; it's about making precise dimensional adjustments that convert your chair from a space-hogging liability into a performance asset that works with your environment.
Why Chair Modding Beats Chair Replacement
Most gamers I consult with assume their only option is replacing their entire chair when they experience discomfort or space issues. Wrong. A $50 armrest upgrade might solve your shoulder pain. Smaller casters could gain you 3cm of clearance from that annoying doorframe. The right cushion insert can prevent back pain without compromising your setup's footprint.
Modding with aftermarket parts gives you three critical advantages:
Space optimization: When your gaming chair for back pain also needs to fit in a 10x12ft room with tight turns, every millimeter counts
Personalized ergonomics: Off-the-shelf chairs rarely fit diverse body types perfectly
Cost efficiency: Strategic upgrades cost a fraction of a new chair while extending your current one's life
Consider casters alone. The door-clearing issue I helped solve for one reader wasn't fixed by moving furniture; it was solved by mapping the room, tracing the recline envelope, and swapping 75mm casters for 50mm glides. A smaller five-star base cleared the swing by exactly 3cm. Check clearance arcs before committing to any modification.
Understanding Your Chair's Modular Components
Not all parts are equally replaceable. Let's break down what you can realistically modify:
1. Caster & Base Systems
Casters and bases are your chair's foundation (literally). For floor-specific advice and replacement steps, see our hardwood floor caster solutions guide. They determine both mobility and spatial footprint. Most gaming chairs use standard 11mm stem casters, but diameters vary from 50mm (glides) to 75mm (standard) to 100mm (premium).
Hard floors: 50-65mm dual-wheel casters with rubber treads prevent scratches while maintaining quiet operation
Carpet: 75mm soft PU wheels provide better roll without damaging pile
Space constraints: Reducing from 75mm to 65mm wheels can save 2cm clearance per side, which is critical for tight corners
The base diameter (typically 650-720mm) directly impacts your recline envelope. Aluminum bases offer strength at smaller diameters than plastic equivalents (ideal for petite users with space constraints). If you're weighing base materials, compare metal vs plastic bases before you buy.
Armrests are the most frequently modified component. Not sure which armrest type you need? Read our 4D vs 3D armrests comparison. Why? They're the first point of contact with your desk and peripherals. Most "gaming chair for back pain" solutions start here with proper arm positioning.
Upgrade considerations:
Height range: Minimum 8" travel for proper elbow alignment with desk height
Width adjustment: Critical for broader-shouldered gamers (4D/5D armrests)
Pivot range: ≥30° inward rotation for controller play
Top material: Memory foam inserts beneath PU leather prevent pressure points
The secret isn't just finding "better" armrests; it's finding ones that align with your desk depth and monitor height. Measure from your seated elbow to desk surface (this determines your ideal armrest height range). For desks 28-30" tall, you need at least 6" of downward travel from neutral seated position.
3. Seat & Back Support Systems
This is where most "gaming chair modding guide" content fails. It's not just about "more lumbar" support: it's about positioned support. Your lumbar pad must sit precisely at L3-L5 vertebrae, which varies by torso length. For a deeper dive into spinal alignment and lumbar mechanics, see our gaming chair ergonomics guide.
Seat depth: Should leave 2-4 fingers between seat edge and knee pit (critical for petite users)
Lumbar height: Must align with natural curve - too high causes neck strain, too low creates lower back void
Recline tension: Adjustable hydraulic systems prevent "sliding down" during recline
For chronic back pain sufferers, memory foam seat toppers (2-3" thick) redistribute pressure while maintaining proper pelvic tilt. Look for wedge-shaped designs that maintain 110-135° hip angle during recline.
Product Review: Aftermarket-Ready Gaming Chairs
Not all chairs are created equal when it comes to modding potential. Let's examine two models with strong aftermarket compatibility.
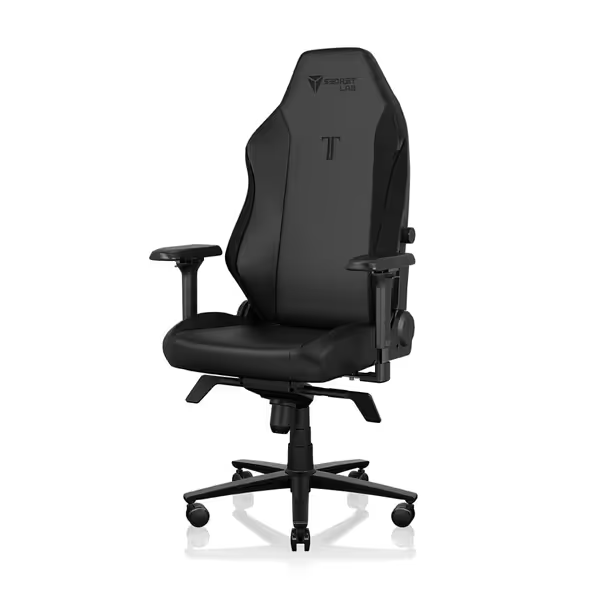
Secretlab Titan Evo
Secretlab Titan Evo Black Gaming Chair
Personalized ergonomic comfort for long gaming and work sessions.
The Secretlab Titan Evo stands out in the DIY chair customization space through its thoughtful modularity. Unlike monolithic designs, it's engineered with replacement in mind (right down to the world's first replaceable armrest top).
Modding strengths:
4D armrest system with standardized mounting (compatible with third-party armrests)
Modular magnetic head pillow allows easy height adjustment without tools
Replaceable lumbar support system with 4-way adjustment
Aluminum base (680mm) offers better strength-to-size ratio than plastic alternatives
Spatial considerations:
Footprint: 22.8" W x 19.7" D (base)
Recline clearance: Requires 36" behind chair for full 165° recline
Seat depth: 19.7" (may be long for users <5'5", which may require an aftermarket shortening solution)
For tight spaces, the aluminum base allows you to maintain stability while reducing clearance needs by 2-3cm versus comparable plastic bases. The cold-cure foam maintains density for years, preventing the "sinking" that often necessitates cushion replacements.
Where it shines for modders: The full-metal 4D armrests use industry-standard mounting hardware, making third-party upgrades straightforward. The magnetic head pillow system means you can easily swap in different densities or shapes as your neck support needs change.
Razer Iskur V2 X
Razer Iskur V2 X
Ergonomic gaming chair with built-in lumbar support for long session comfort.
Wider seat with plush fabric reduces pressure & heat.
Cons
2D armrests may rotate too easily during use.
Customers find the gaming chair well-built, comfortable, and easy to assemble, with good back support including built-in lumbar support. The appearance receives positive feedback, with one customer noting it's stylish without sacrificing breathability.
Customers find the gaming chair well-built, comfortable, and easy to assemble, with good back support including built-in lumbar support. The appearance receives positive feedback, with one customer noting it's stylish without sacrificing breathability.
The Razer Iskur V2 X enters the modding conversation with its built-in lumbar support system (a double-edged sword for customization). The integrated nature means you can't simply bolt on a new lumbar pad, but it also solves the "wrong spot" problem that plagues many gamers.
Modding strengths:
Pre-shaped lumbar curve matches natural spine alignment (reducing need for aftermarket lumbar)
Widened seat base with reduced edges accommodates various body types
Breathable multi-layered fabric greatly reduces heat buildup (less need for aftermarket cooling)
2D armrests use standard mounting hardware for potential upgrades
Spatial considerations:
Footprint: 27.58" W x 27.58" D (larger than Secretlab)
Recline clearance: Requires 34" behind chair for 152° recline
Seat depth: 18.9" (better for petite users than most race-style chairs)
This chair's standout feature for modders is its sculpted form that guides your body toward optimal pressure distribution. The high-density foam maintains shape longer than standard PU foam, meaning fewer cushion replacements over time. However, the built-in lumbar limits your ability to modify this critical component, though for many with back pain, the fixed position provides immediate relief where adjustable pillows failed.
Making Your Modding Decision
Step 1: Map Your Constraints
Before ordering any parts, convert your space into a clearance diagram:
Trace your current chair's footprint at neutral and reclined positions
Mark all obstacles (door swings, cable management, desk legs)
Identify the minimum clearance required (typically 2-3cm buffer)
Use this simple formula: Recline clearance = (seat depth × recline angle) + base overhang. If your calculation shows less than 2cm clearance to obstacles, you need smaller components.
Step 2: Match Parts to Your Pain Points
Back pain: Focus on seat depth modification first, then lumbar position
Space constraints: Prioritize base diameter reduction and caster size
Arm discomfort: Measure elbow-to-desk height before selecting armrest upgrades
Critical rule: Always verify part dimensions before purchasing. Measure your current components and compare with manufacturer specs. Most gas lifts follow ISO standards (Class 3 or 4), but base bolt patterns vary between brands.
Step 3: Installation Considerations
Casters: Tool-free replacement (pull out old, push in new)
Armrests: Usually require Allen wrench (keep original hardware as backup)
Gas lifts: Can be dangerous. Never attempt to repair; only replace with exact specifications
Upholstery: Professional help is recommended unless you have sewing experience
For first-timers, start with caster and armrest upgrades: they offer the highest impact with the lowest complexity. Take photos before disassembly and keep small parts organized.
Final Thoughts: Your Actionable Modding Plan
Your chair shouldn't fight your space: it should enhance it. The most successful gaming chair modifications I've seen start with precise measurements, not wishlists.
Measure the room; then let the chair earn its space.
Your immediate next steps:
Map your space: Create a simple diagram showing chair footprint at neutral and reclined positions
Identify your constraint: Is it width? Depth? Recline clearance? This determines your priority upgrades
Measure your current components: Especially base diameter, caster size, and armrest mounting pattern
Start small: Order replacement casters sized for your floor type and space constraints
Remember: Great ergonomics must coexist with your room, desk, and devices. The perfect chair isn't the one with the most features: it's the one that fits your constraints while solving your specific pain points.
Check clearance arcs before every purchase, and you'll transform your gaming chair from a space-hogging liability into a precision tool that works with, not against, your environment.
Learn how a $250 gaming chair performs in long sessions: fabric stays cooler than leatherette, ergonomics suit 165–190 cm users, with open, stable seating.
Learn to assess massage gaming chairs by measuring fit, mapping pressure and heat, checking adjustability and footprint, and matching specs to your space.
Get evidence-backed picks for elderly gamers: learn which specs truly support long sessions, compare cost-per-hour, and avoid durability and warranty pitfalls.
Learn how to choose and transport a pink gaming chair that fits car trunks and tight LAN spaces, with precise measuring, clearance arcs, and quick disassembly.